News
13 May 2021
Getting more vocals in the live mix when everything is against you

Subscribe to CX E-News
I have rarely had the luxury of mixing on a big stage (festivals and stadiums). I, like a lot of us, have to constantly battle with the band that is louder than the PA or the singer that can’t project into the mic. But since the increased availability of digital mixers and purchasing my own DiGiCo SD11, I’ve been able to experiment with addressing this issue, and what I discovered is the magical concept of Parallel Compression, but implemented in the live environment. So what is Parallel Compression? Well first of all, it’s not a new concept. It’s been used in studios (and live) for ages – it’s just a little bit more time consuming to implement live. You need more cables, potentially some splitters, and a spare compressor.
To understand Parallel Compression, you first need to understand compression and its issues. A compressor limits the dynamic range of an audio signal (dynamic range – the difference between the loudest part of the sound and the softest part of the sound). The loud parts of the signal are limited (threshold/ratio) and the soft parts are boosted (gain makeup), and essentially you end up with a signal that is the same “volume” all the way through. This can be useful when you have another 23 channels of audio to manage at the same time. Compress the main vocals, put that gain up a bit and it can get out in the mix better. So, where’s the issue? Well, the loud parts are no longer loud, and the soft parts are no longer soft… not at all confusing, is it? Music isn’t like that. Singers start soft and then build up to the massive ending and blow the roof off. So this is where Parallel Compression is useful – get the vocals out in front, while still having the soft parts soft (but audible) and the loud parts blowing the roof off, and then still having the ability to manage the other 23 channels on the desk.
This is how I do it: I run the vocals into two input channels and put a compressor on both channels. On the first channel (dry) I use the compressor to keep the channel from going nuts – a very low ratio, no makeup gain, soft knee and adjust the threshold to kick in when needed (more on this later). On the second channel, a really high ratio like 1:6 (yes, on the vocals) and about 6dB worth of makeup gain. The actual values for everything will vary depending on your situation, but that’s the aim.
When it comes to the threshold and how to actually mix it, this is the secret herbs and spices. The threshold for the dry channel just needs to be set to barely kick in – just let that channel be free and use the compressor for signal protection. On the second channel set the threshold so that when the singer is singing soft, it’s not doing anything, but when the singer starts getting to normal or even loud singing, the compressor smacks down at least 6dB in gain reduction. The better the compressor, the more you can let this go down, but the 6dB is usually achievable by most compressors without sounding bad.
Then the actual fader mix. Using the dry channel, set your fader to the right position so the vocals sound good in the mix when the song is loud. Use the really compressed channel and set its fader to the right position when the song is soft. If you get it right, what ends up happening is that only one channel goes through the mix at any time. When the singer is soft, the dry channel doesn’t have enough signal going through it so you can’t hear it, but the wet signal has the makeup gain on it, so you hear that. But when the singer goes to blow the roof off, the wet channel compresses so much that the dry signal takes over and lets the singer go for gold. Controlling the dynamic range without controlling the dynamic range!
Due to the flexible routing on DiGiCos and a compressor on every channel, subgroup, and matrix, you can do this multiple ways. Do it the right way and save your busses for more important things. Here’s how I do it (that works pretty well for me):
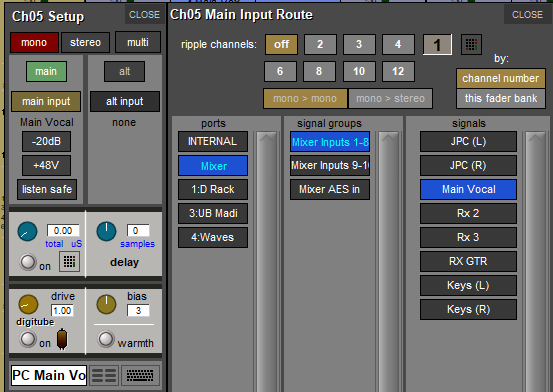
Route your main vocals into 2 channels:
DRY Channel:

WET Channel:
Setup the compressors – use the attack, release, ratio and gains in the images as a starting point. The threshold will need to be adjusted to your scenario:
DRY Channel:

WET Channel:

Do the mix. As a starting tip, have the fader in the same position and then move from there i.e. 0dB)
As an additional tip, you can do this on any mixer that has flexible routing options. And if you find yourself on an analogue mixer with a spare compressor and spare subgroup, send the vocal to the subgroup and insert a compressor on the subgroup – use the subgroup as your “wet” channel.
Alvin started mixing at 15 years old and has spent the last 20 years constantly learning things from anyone and everyone. Alvin has mixed after-party performances for Blackstreet, Mya, Bruno Mars, Bobby Brown, A$AP Ferg and many more RnB and Hip Hop artists. He works locally for Jaanz International Singing Academy mixing open mic nights and events. His weapon of choice is the DiGiCo SD11, which helped secure his current role at DiGiCo distributor Group Technologies handling support and training for DiGiCo in Australia and New Zealand.
Subscribe
Published monthly since 1991, our famous AV industry magazine is free for download or pay for print. Subscribers also receive CX News, our free weekly email with the latest industry news and jobs.
Recent posts


Latest jobs