News
26 Jun 2018
How to: Fix frequency problems in wireless mics
Subscribe to CX E-News
How to:
Fix frequency problems in wireless mics
By Jeff MacKenzie – Manager, Applications Engineering and Training, Jands Pty Ltd
![]() Having problems with your wireless microphone system? Symptoms such as drop-outs and re duced range are often assumed to be caused by faulty hardware. However often issues such as these are caused by poor frequency selection. In this article we will explain why frequency selection is so important, and provide step-by-step instructions specific to individual Shure
Having problems with your wireless microphone system? Symptoms such as drop-outs and re duced range are often assumed to be caused by faulty hardware. However often issues such as these are caused by poor frequency selection. In this article we will explain why frequency selection is so important, and provide step-by-step instructions specific to individual Shure ![]() wireless microphone models to assist with optimal setup and helpfully avoid the expense and inconvenience of those dreaded “No Fault Found” service reports.
wireless microphone models to assist with optimal setup and helpfully avoid the expense and inconvenience of those dreaded “No Fault Found” service reports.
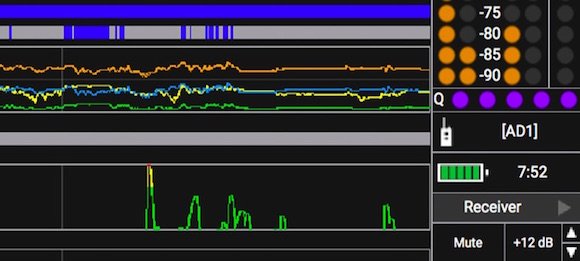
Drop-outs and/or reduced range are often caused by interference from another service operating on the same frequency as your wireless microphone system. Such issues can be avoided by choosing clear frequencies for all of your wireless microphone systems before each use.
But how do we find clear frequencies? The exact process will vary between models, but most incorporate a user initiated scan process to listen to the available spectrum and choose the “best” frequencies for your systems. This may sound complicated, but the process is pretty simple.
Once considered a luxury item, modern wireless microphone systems have managed to pack professional features into more cost effective packages, making them more attainable to a wider range of users. The freedom afforded by wireless microphones is highly desired as they provide freedom of movement and expression not possible when tethered by a cable. However this new found freedom does come at a cost, not just a financial cost, but a resource allocation cost.
Wireless microphones operate using shared radio spectrum. As the number of wireless microphones increases, so does the demand for this shared radio spectrum, to the point that careful coordination is required to avoid frequency conflicts.
Radio frequency conflicts tend to be the root cause of many issues encountered by wireless microphone users. Experience has shown that a significant percentage of product returned to our service department assumed faulty was actually due to radio frequency conflicts, which generally could have been resolved on site.
So why is frequency coordination so important?
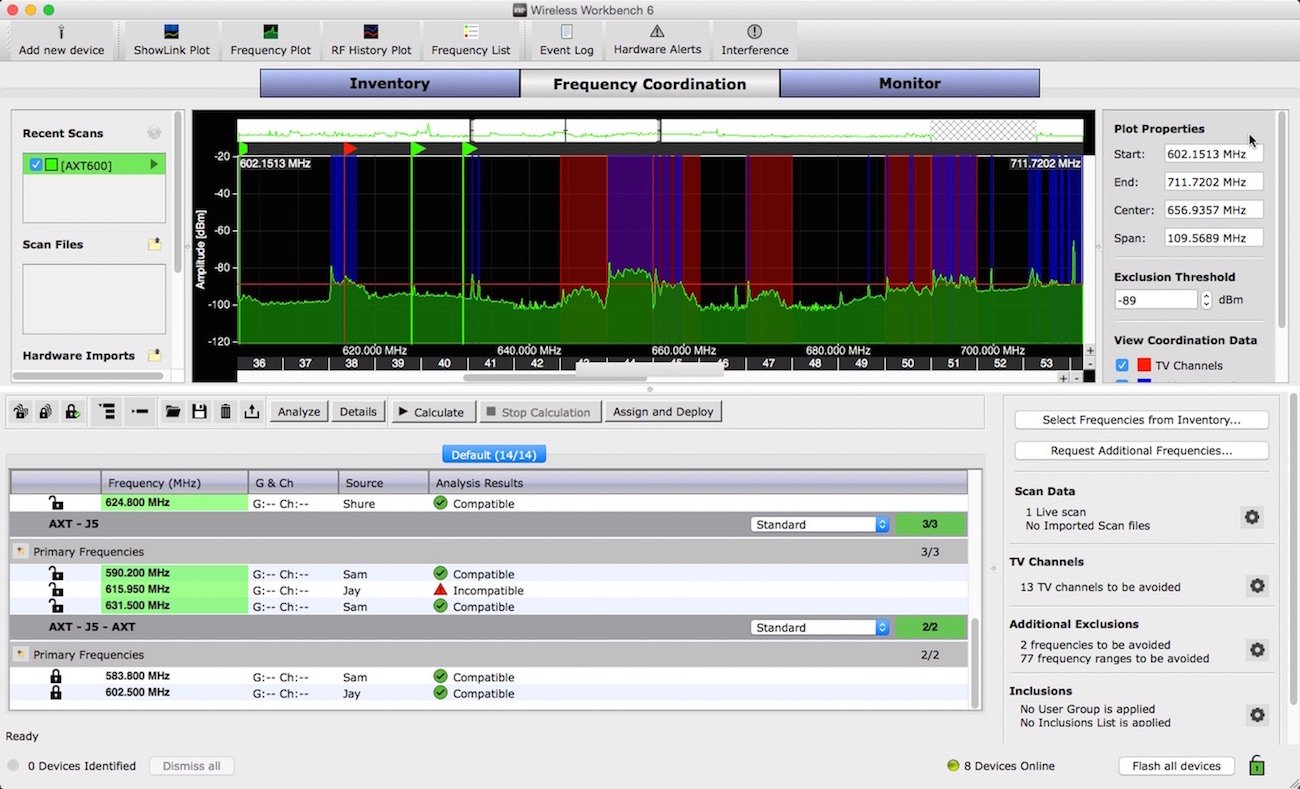
In Australia most wireless microphone systems operate in radio frequency spectrum shared with digital TV broadcast services. The digital TV allocations vary from location to location, so it is not possible to pre-set a wireless microphone system to a universally clear frequency. If you tour your wireless microphone system, you really should check and possibly select a new frequency for each new location.
We operate under a secondary user basis. Meaning we are not permitted to cause interference to the primary user (TV) and have no protection from interference from the primary user or from other secondary users (other wireless microphone systems). In other words it’s all on us. It is our responsibility to find clear frequencies and if we suffer interference from anything, it is our responsibility to change frequency.
OK, but what does “interference” sound like? – I’m glad you asked.
Once upon a time radio interference did have a sound, and it wasn’t pleasant. However newer generation wireless microphone systems have come a long way, and go to great lengths to protect you from those unpleasant sounds, particularly if you are running digital systems. Most systems will mute (insert silence) rather than play loud static bursts or hums, pops, or other general nastiness.
This is certainly more pleasing to the ear. However these deliberate “muted for your protection” actions can easily be confused with radio drop outs. We often hear stories of systems that previously covered extensive useable range, then one day, for no apparent reason, that range is greatly reduced. This is often perceived as a fault with the product resulting in the system being returned to service as “faulty”. However this is not a product issue, it’s a frequency coordination issue.
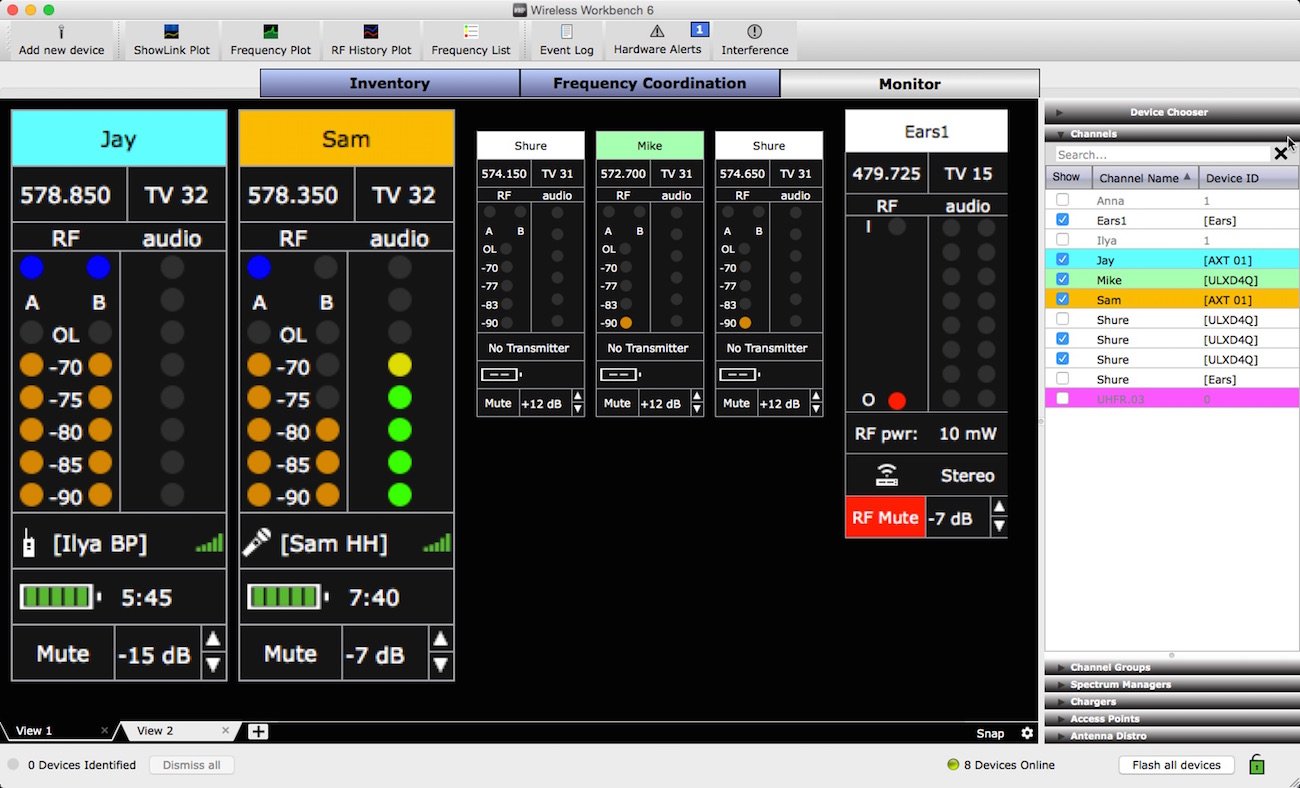
Modern wireless microphone systems usually feature some form of “scan and set” functionality enabling quick and efficient selection of clear frequencies. Better systems will not simply select the first clear frequency they find, they will analyse all available frequencies and select and deploy the best available frequency based on scan results.
It is critical that operators utilise these features, particularly if operating in urban areas with high likelihood of spectrum contention from TV broadcasters, other wireless microphone systems and possibly sources of manmade noise such as LED walls etc.
Running wireless microphone systems without first scanning is equivalent to pulling out of your driveway and merging onto a main road without looking. Sure, you may be lucky and not collide with oncoming traffic THIS time, but one thing is certain; the more often you do this the higher the probability of a collision.
Best practise for wireless microphone operation is to scan for clear frequencies before each operation. There is no guarantee that a frequency you used successfully last night / week will be still clear the next time you return to the same location. The exact process to scan and select frequencies varies from product to product, but the general process is as follows, and shouldn’t take more than a minute or two:
- Ensure all of your wireless microphone transmitters are switched off
- Setup receivers and receiver antennas in final position
- Initiate the scan process on ONE receiver only
- Set the linked transmitter to the frequency (channel) indicated on the receiver. This may require manual settings on the transmitter, or depending on the product you may be able to transfer the setting at the push of a button via Infrared (IR) transfer
- Ensure audio transfer from transmitter to receiver
- If additional systems are in use, repeat the above, but keep the transmitter for the first system ON. The additional systems need to be aware of each other to coordinate compatible frequencies Repeat for all additional systems, one at a time, until all have been set to compatible frequencies
- The above process should be repeated each time the system is used, especially if changing locations as encountered on touring systems.
We trust this article has been helpful. Please remember, if you get stuck you can contact our product support specialists for help. Email support@jands.com.au or phone (02) 9582-0909.
This article first appeared in the print edition of CX Magazine June 2018, pp.38-39. CX Magazine is Australia and New Zealand’s only publication dedicated to entertainment technology news and issues. Read all editions for free or search our archive www.cxnetwork.com.au
Subscribe
Published monthly since 1991, our famous AV industry magazine is free for download or pay for print. Subscribers also receive CX News, our free weekly email with the latest industry news and jobs.
Recent posts


Latest jobs