News
14 Dec 2015
THE MILL REPORT: IMPROMPTU ACOUSTIC TREATMENTS
Subscribe to CX E-News
Often it’s the lack of experimentation with room treatment that leaves many a home recording sounding thin, resonant and harsh. Left unchecked, untreated room reflections can severely impact upon the clarity and focus of direct signals into a microphone, though initially this may be hard to judge. It’s often only when mix compression is applied to these recordings that the insidious nature of these corruptions is revealed. If you don’t do something to ‘shut down’ the main resonances of your tracking spaces when you record, you will always lose the battle against corrupting ambience. But don’t let fear of the unknown or your general ignorance of complex acoustic theory paralyse you. More often than not there’s an easy fix to improve the situation. Just don’t use your eyes.
Too many home recording enthusiasts have read too many glossy magazines showing off the fancy recording spaces of commercial studios. Every time you see these photos the studios look immaculate: the lighting just right, everything perfectly placed for the camera lens, not a lead or impromptu room treatment in sight.
But go to any recording session in these places and you’ll quickly discover the opposite scene: stuff everywhere, instruments all over the place, chairs, stands and leads here, there and everywhere, and room treatments of every shape and size uglying up the space.
PLEASE, NO PHOTOGRAPHS!
Recording engineers do whatever it takes to make something sound good in the privacy of a commercial recording studio session and the same priorities should apply everywhere, particularly at home. Recording sound is not about what looks right, or fancy, or slick – though that’s always the temptation. It’s about getting something to sound right, or at the very least better than it was, and often that requires experimentation.
It’s time more of us got off our behinds and did something about the room sounds we record in, no matter where these happen to be. Far too often I’ve seen – and most certainly heard – how complacent engineers and musicians can get when they record; always keen to talk about the mic they used, never the room they were in or what they did to it to make it sound good.
I’ve heard every excuse under the sun about why nothing was done to modify the behaviour of a bad sounding room, and frankly these have never held water.
No more excuses folks. It’s time to experiment.
MODIFY NOT BEAUTIFY
Everywhere you record you should bring with you some materials that can be used to modify the spaces you’re in. Stuff like pillows, doonas, a roll of Tontine, a bolt of fabric or even a small roll of carpet can work wonders in most ‘hard’ tracking environments where the acoustics might need ‘softening’. Though this stuff might be a hassle to take with you, or look stupid on your equipment list, the fact is, looks are deceptive. You need to overcome the fear of things always being judged based on what looks ‘wrong’ or ‘uncool’ as fast as you can.
CHAOS THEORY FOR CHUMPS
In the absence of an acoustically designed space that costs six figures to build (and almost as much to hire), the next best thing is chaos… quite literally. The more chaotic a room is the better it will typically sound. Problem is, most people like things to be neat and clean, but these characteristics don’t necessarily promote good sound.
The best thing about chaos is that it’s cheap to setup and almost anything can contribute to the solution. If you’re recording room is sounding too ambient and resonant, start chucking stuff in there, and don’t worry about where. Sound will find it. In the average room a sound wave hits about 90 surfaces a second!
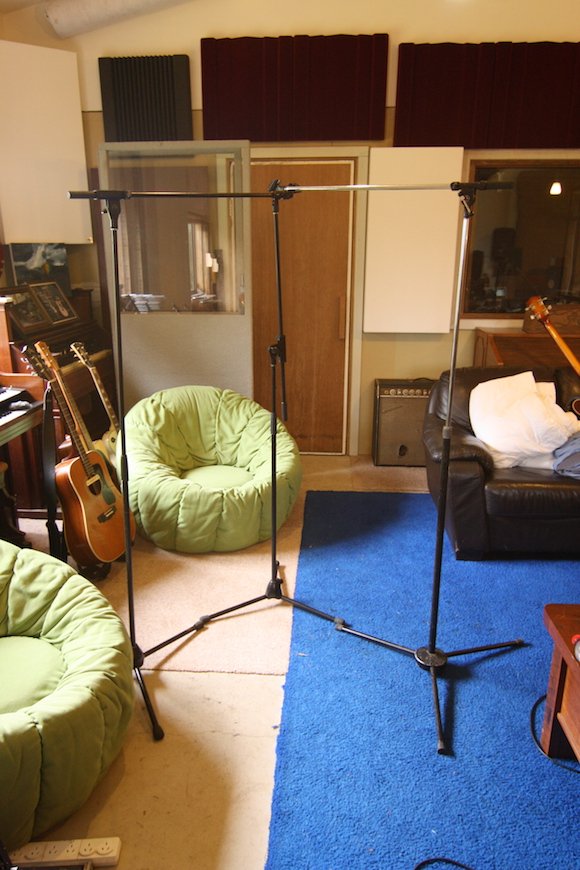
By contrast, empty rooms are the worst. They’re far wilder than the same spaces inhabited by people and their clutter. The obvious lesson to learn from this is that more ‘stuff’ helps a room exhibit less of its nasty acoustic anomalies: standing waves, flutter echoes and long decay times (particularly prevalent in rooms featuring hard, parallel surfaces) which, let’s face it, is nearly all of them.
When people record in homes, all to often the recording spaces are cleared of the home furnishings (clutter) first so that there’s room for the musicians and their instruments. Notwithstanding the fact that the musos obviously need to be able to stand in the room and play, this de-cluttering is a mistake. Couches, furnishings… frankly anything that adds chaos to the room will generally improve the ability of that room to resist its own tendencies to corrupt the sound sources you’re trying to capture. Sure, recording in a room with all this stuff might look uncool or downright pedestrian, but follow that logic to its conclusion and you’ll end up with a good-looking, crap-sounding recording.
SOME EASY TREATMENT OPTIONS
There are so many ways to treat a room in preparation for recording that it’s hard to know where to start to give examples. Here are a few that can be thrown up quickly and used anywhere.
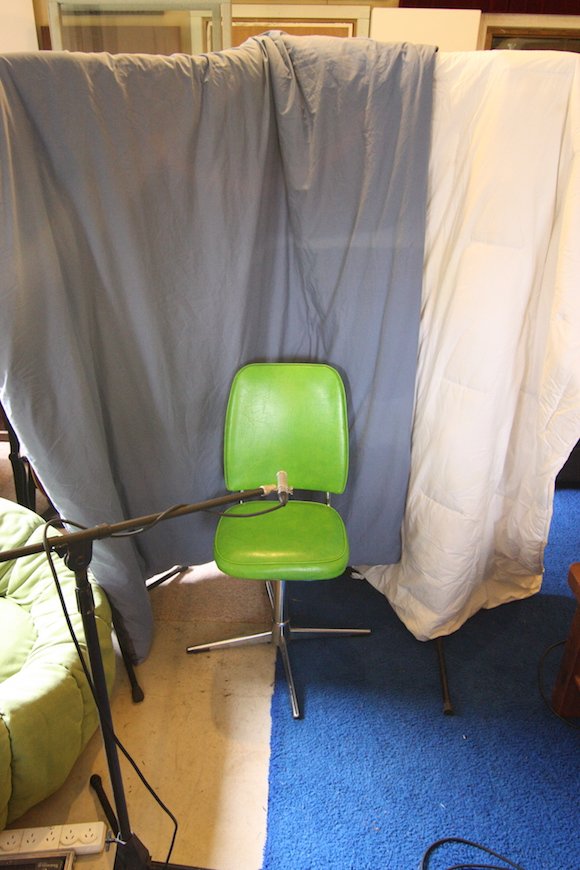
1: The Dead V. My favourite, and one that’s used all the time in just about every session in the world, is what I’ll call here a ‘Dead V’ (don’t think I’ve ever given it a name before).
A ‘Dead V’ is great for recording almost any instrument that requires a more isolated, deader sound than an unmodified room could hope to provide.
By placing two soft walls behind the singer/instrumentalist in an open V configuration so that any directional mic points straight at its centre, you not only deaden the room overall, you provide a far less reflective backdrop for the performer. Remember, by choosing a directional mic like a cardioid, and by pointing this straight at the singer whose back is to the V, you will capture far less room ambience and a far tighter sound.
The reason for this is simple: where the mic points to is where the corruptive ambience primarily comes from. Most people think deadening the back of the mic is the answer – a notion that’s reinforced by the plethora of portable microphone baffles on the market – but this is not really the case. Small baffles directly behind a mic certainly help, but in the case of a cardioid pattern mic at least, they really only help isolate the mic from sounds arriving from the rear where the mic is already the least sensitive.
You can build a Dead V with either a few boom mic stands or lengths of fairly strong dowel.
To build the mic stand option, fully extended two boom stands up and at 90-degrees (parallel to the floor). In this state they would be impossibly weak on their own, but at the centre of the V, set up a third stand to carry the weight of the extended arms. Gaffa tape them together or use the mic clip of the middle stand to hold the others up [as per photo]. Carefully throw a couple of doonas or heavy canvases over this frame arrangement and voila, a Dead V. If it’s strong enough and high enough you might also consider throwing something up and over the top to create a roof, but this puts more stress on the structure than it can often handle. You don’t want it coming down on the singer’s head (…or maybe you do!).

2: Fly a flag. Similar in construction is hanging a soft material over a single boom stand that’s configured like a T-shape. Extend a boom stand to its full height and put the arm horizontal to the floor, with half and half of it either side of the pivot point. Now throw whatever soft fabric you have over it to reduce the ambient decay in the room. If the room has a flutter echo caused by parallel surfaces, this should help kill it off, particularly when you put up several. Put them against a wall if they’re too precarious freestanding in the room.
3: Acoustically treated artworks. If your lounge room is also your recording room there’s a fair chance you may have some paintings on the walls. If so – and particularly if they’re artworks on canvas – take them down and fill their inner voids with something like Tontine Acoustisorb 3. It will look like nothing has changed, except that now the paintings will contribute more to the sound absorption in the room. Remember, for tracking purposes, it’s not so much where the hard, absorptive and diffuse surfaces are as what proportions they exist in inside the room. Assess the one you’re recording in to determine if it’s too dead or too live and act accordingly.
4: Door and window treatments. No-one can be realistically expected to modify the windows and doors of a rented house or ‘location recording’ space to any great degree, yet by and large these are the weak points of a building where problematic sound gets in and out. Treating these with something is preferable to nothing… but what?
If you’re only on site for the two days of a tracking session then ‘temporary’ is the operative word. Here again, heavy canvases or blankets, whilst they don’t do much, definitely contribute something, both in terms of what comes in, what goes out, and more importantly, what the room sounds like. If you’re handy, have access to materials and tools, and can get away with minor damage, you could always screw sheets of MDF to the insides of the window frames. (I did that to a rented house every week for about five years!)
A SLIGHTLY MORE INVOLVED OPTION
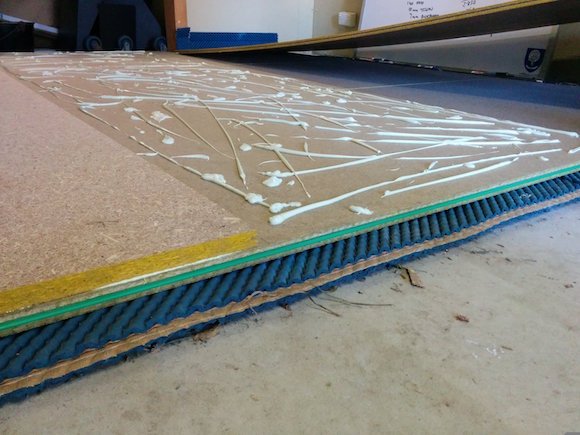
Polyurethane pucks, three layers of underlay and two layers of yellow tongue form a good floating floor to isolate instrument
Temporary isolated floor. Though this is not necessarily the most portable concept in the world, it can be applied quickly and fairly easily in your home studio without altering any existing structures or it costing the earth.
Most home studios are sonically porous partly because sounds within it are coupled to the walls and floor, making the structure ring like a bell, and consequently transmit sound.
To improve the isolation of things like drums and guitar amps from your house structure, consider this simple technique. Buy a roll of polyurethane stripping that’s say 10mm thick and an inch wide and cut it up into two or three-inch ‘pucks’. Lay these out every 200mm or so like a checkerboard to form any size you like (for this example we’ll make our floating floor 3.6m x 1.8m). Next, get some old carpet underlay and carefully roll it out over the pucks, trying your best not to disturb them too much. Get a second roll of underlay and roll this out perpendicularly across the first layer. Apply a third layer across the second layer in the same manner, forming a three-layered ‘pastry’ of underlay.
Now get some yellow-tongue flooring and lay it gently onto the underlay so that it simply floats on top. For this floor we’ll join two pieces of standard 3.6m x 900mm together to form our 3.6m x 1.8m deck. Now place a second layer of yellowtongue perpendicular across the first, putting something like Fuller Firesound sealant or Green Glue between the layers (see photo) like a messy Pro Hart or Jackson Pollock painting. Pull the two layers tightly together with 40mm screws and there you have it: a floating floor for the drums or amps.
Not everything you do is to improve the sound of a recording is about predictive mathematics and standard protocols. If you’ve got problems with the sound in your recording spaces, get off your chair, get out there and do something about it. Whatever you do is bound to be better than making excuses.
First published in CX Magazine (December, 2015)
Subscribe
Published monthly since 1991, our famous AV industry magazine is free for download or pay for print. Subscribers also receive CX News, our free weekly email with the latest industry news and jobs.
Recent posts


Latest jobs